Introduction
In the ever-evolving landscape of machine learning and artificial intelligence, the Cloudera Machine Learning platform and Text-Generation-WebUI are combined to create an application that enables users to experiment with text generation features on the Cloudera Machine Learning Platform. This project opens up a world of possibilities for developers, data scientists, and content creators seeking to harness the power of natural language generation on the CML platform.
In this blog post we will describe the following aspects of CML APM, Text-Generation-WebUI and how AMP-based Text Generation Web UI can be used in your CML environment.
- What is Cloudera CML AMP
- What is Text-Generation-WebUI
- How to deploy Text-Generation-WebUI as Cloudera CML AMP
- Main features of Text-Generation-WebUI
- How to download and use Machine learning models from external sources
- How to use REST APIs to access Text Generation features
- How to Train new machine learning models to meet your requirements
1. What is Cloudera CML AMP (AMPs)
Cloudera Machine Learning (CML) AMP stands for Applied Machine Learning Prototypes. It is a collection of pre-built ML projects that can be deployed with one click directly from Cloudera Machine Learning. AMPs enable data scientists to go from an idea to a fully working ML use case in a fraction of the time.
AMPs provide an end-to-end framework for building, deploying, and monitoring business-ready ML applications instantly. They encode best practices for solving machine learning problems, and each step in the solution (e.g. data ingest, model training, model serving, etc.) is declared in a YAML configuration file.
AMPs are designed to be easy to use and customize, even for data scientists who are new to ML. They can also be used as a starting point for building more complex ML applications.
Here are some of the benefits of using Cloudera CML AMPs:
- Accelerate time to value: AMPs can help data scientists deploy ML applications into production much faster than they could if they had to build everything from scratch.
- Reduce risk: AMPs are pre-built and tested, so they help to reduce the risk of errors and problems in production.
- Improve productivity: AMPs free up data scientists to focus on the most important aspects of their work, such as data preparation and model development.
- Increase collaboration: AMPs can be shared and reused between data scientists, making it easier to collaborate on ML projects.
Cloudera CML AMPs are a powerful tool that can help data scientists build, deploy, and monitor ML applications faster and more easily.
2. What is Text-Generation-WebUI
Text Generation Web UI is a powerful and user-friendly tool for interacting with large language models (LLMs). It is built on top of the Gradio framework, which provides a simple and intuitive interface for creating and deploying machine learning models on the web.
It supports a wide range of LLMs, including transformers, GPTQ, AWQ, llama.cpp (GGUF), and Llama models. It also supports a variety of features that make it easy to experiment and explore the capabilities of LLMs, such as:
- Code syntax highlighting: It can highlight the syntax of code snippets in the generated text, making it easier to read and understand.
- Chat mode: It can be used in a chat mode, allowing users to interact with the LLM in a conversational way.
- Extensions: It is extensible, allowing users to develop and add their own features.
It is a valuable tool for researchers, developers, and creatives who want to experiment with LLMs. It is also a great way to learn about LLMs and how to use them.
Here are some examples of how this tool can be used:
- A writer can use it to generate ideas for new stories or blog posts.
- A researcher can use it to generate hypotheses for new experiments.
- A developer can use it to generate code snippets or documentation.
- A creative person can use it to generate poems, scripts, or musical pieces.
Text Gen UI is still under development, but it is already a powerful and versatile tool for interacting with LLMs. It is free to use and open source, and it is available for download on GitHub.
Key features and capabilities of this tool, include:
- User-Friendly Interface: Discuss how the tool offers an intuitive and user-friendly web-based interface for interacting with text generation models.
- Model Selection: Explain how users can select different text generation models, including pre-trained models and custom models.
- Monitoring: Highlight any built-in monitoring or performance tracking features for the generated text.
- Security: Address the security measures in place to protect sensitive data and model access.
- Training models using customer dataset
- Output Formats: Mention the supported output formats, such as plain text, JSON, or HTML.
3. Main features of Text-Generation-WebUI
It is a Gradio-based web UI for Large Language Models.
The main features of a text generation UI are:
- Intuitive interface: The UI is easy to use and navigate, even for users who are not familiar with text generation.
- Support for multiple LLMs: The UI supports a wide range of LLMs, so that users can choose the best model for their needs.
- Customizable parameters: The UI allows users to customize the parameters of the LLM, such as the temperature and length of the generated text.
Text generation UIs can be used for a variety of purposes, such as:
- Writing creative content, such as poems, stories, and scripts.
- Generating code snippets or documentation.
- Translating languages.
- Answering questions in a comprehensive and informative way.
- Creating chatbots.

4. How to deploy Text-Generation-WebUI as Cloudera CML AMP
Create a CML project :
1) Login to CML
2) Get the AMP project URL from git : https://github.com/insightslab/cml_text-generation-webui-AMP /
3) Create a new CML project and fill the AMP git URL as shown below
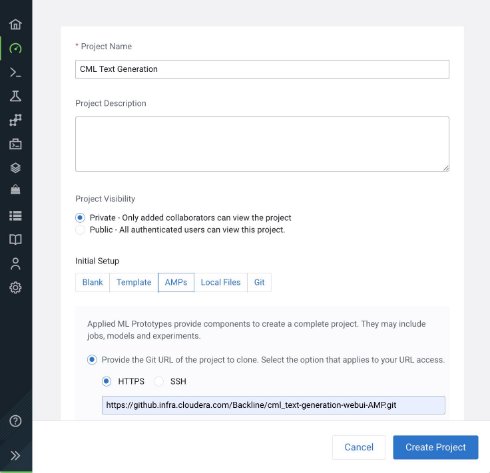
4) Click the ‘Create Project’ button and it will take around 15 to 20 mins to create the Text Gen UI application. This Application requires atleast 1 GPU , hence ensure to select a CML workspace with GPU(s)
5) Once after completion of Application creation, click on the Application Tile from Applications →
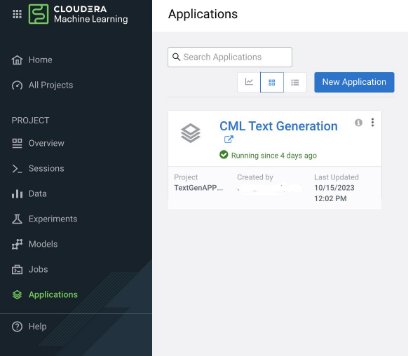
6) This will open Text Gen UI in a new browser window
5. How to download and use Machine learning models from external sources
Follow the below steps to download and load a custom model from Hugging Face into a Text Generation UI. Here’s a step-by-step guide for this process
- Switch to the Model Tab:
- Navigate to the “Model” tab within your Text Generation UI.
- Enter Hugging Face Username/Model Path:
- Locate the “Download custom model or LoRA” edit box.
- Enter the Hugging Face username/model path, for example, “daryl149/llama-2-7b-chat-hf.”
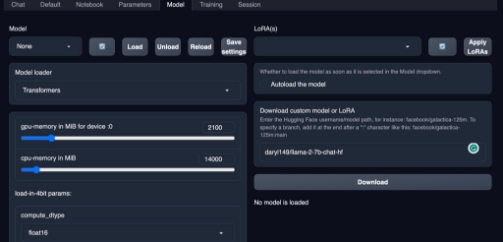
- Press the Download Button:
- After entering the model path, click the “Download” button.
- The application will initiate the download process. Be patient as this may take a couple of minutes, depending on the model size and your internet connection speed.
- Refresh Model Lists:
a. After the download is complete, refresh the list of available models. This step ensures that the newly downloaded model is recognized by the UI.
b.
- Select the Newly Downloaded Model:
a. From the “Model” dropdown list, select the custom model you just downloaded. It should now be visible among the available models.
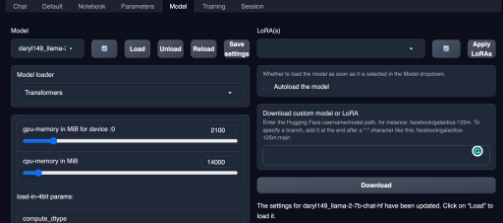
- Press Load Button:
- Once you’ve selected the model, press the “Load” button. This action loads the model into the application.
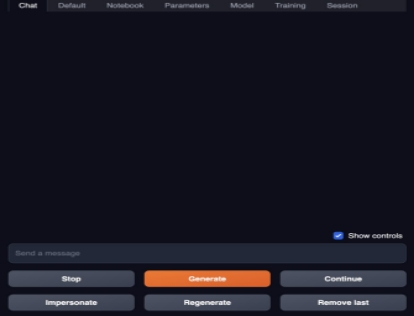
- Switch to the Chat Tab:
- After successfully loading the model, navigate to the “Chat” tab within the UI. This is where you can interact with the model.
- Send Messages to Test the Text Generation Application:
- In the “Chat” tab, you can send messages as prompts to the loaded model.
- Start sending messages to test the text generation capabilities. The model will respond based on the prompts you provide.

By following these steps, you can seamlessly download, load, and test a custom model from Hugging Face in your Text Generation UI. This process enables you to leverage specific language models for various text-generation tasks.
6. How to use REST APIs to access Text Generation features
REST API support on a text generation UI allows developers to interact with the UI programmatically. This can be useful for a variety of purposes, such as:
- Integrating the UI into other applications.
- Automating text generation tasks.
- Building custom text generation tools.
To use REST API support on a text generation UI, developers typically send HTTP requests to the UI’s API endpoints. These requests can be used to specify the text generation parameters, such as the input prompt, the LLM to use, and the temperature and length of the generated text. The UI will then generate the text and return it in the response.
Here are some examples of how REST API support on a text generation UI can be used:
- A developer could build a custom tool that uses the UI’s API to generate marketing copy for different products.
- A researcher could use the UI’s API to automate the process of generating and evaluating different hypotheses for a new machine learning model.
- A content creator could use the UI’s API to generate ideas for new blog posts or social media posts.
REST API support on a text generation UI is a powerful feature that can open up new possibilities for developers and users alike.
Here are some of the benefits of using REST API support on a text generation UI:
- Flexibility: REST API support allows developers to interact with the UI flexibly and powerfully.
- Automation: REST API support can be used to automate text generation tasks, saving developers time and effort.
- Scalability: REST API support allows developers to build scalable text generation applications that can handle large volumes of requests.
Overall, REST API support on a text generation UI is a valuable feature that can be used for a variety of purposes.
Python Code example on how to use REST API to access Chat features
7. How to Train new machine learning models to meet your requirements
The following steps are mandatory in order for the Training of the Model to take place:
- First place the dataset format file in JSON if you plan to use a specific format for training the model under the “training/formats” location. For example here is a sample format:
{

"instruction,output": "User: %instruction%\nAssistant: %output%", "instruction,input,output": "User: %instruction%: %input%\nAssistant: %output%" }
- Then place the dataset in “training/datasets” which matches the format file you have inserted in the above step. For example the dataset which matches the above example format:
   [

{

"instruction": "Give three tips for staying healthy.",

"input": "",

"output": "1. Eat a balanced and nutritious diet: Make sure your meals are inclusive of a variety of fruits and vegetables, lean protein, whole grains, and healthy fats. This helps to provide your body with the essential nutrients to function at its best and can help prevent chronic diseases.\n\n2. Engage in regular physical activity: Exercise is crucial for maintaining strong bones, muscles, and cardiovascular health. Aim for at least 150 minutes of moderate aerobic exercise or 75 minutes of vigorous exercise each week.\n\n3. Get enough sleep: Getting enough quality sleep is crucial for physical and mental well-being. It helps to regulate mood, improve cognitive function, and supports healthy growth and immune function. Aim for 7-9 hours of sleep each night."

},

{

"instruction": "What are the three primary colors?",

"input": "",

"output": "The three primary colors are red, blue, and yellow. These colors are called primary because they cannot be created by mixing other colors and all other colors can be made by combining them in various proportions. In the additive color system, used for light, the primary colors are red, green, and blue (RGB)."

}

]
- On the application select the “Model” tab and please select the model with which you would like to perform the training on. If you would like to Download a Model of your choice use the “Download custom model or LoRA” option and then download the model.
- Once the Model is selected and all the necessary parameters related to the model are tuned, then load the model.

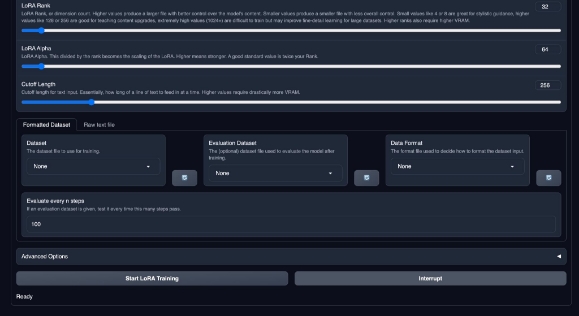
- Then navigate to the “Training” Tab and first fill up the name of the Lora you would like the training to be stored as.

- If you’d like to modify the parameters of the Training please do as required.
- At the end you will see the “Formatted Dataset” Tab, in the “Dataset” box select the input dataset that you have placed in step B.
- In the “Evaluation Dataset” Box, you can have the optional Dataset which you would use to evaluate the model after training.
- In the “Data Format” box select the format of your input DataSet which was inserted in Step A.
- Next you have the Advanced settings options which are optional if you have a certain requirement.
- Next click on the “Start Lora Training” button.
- Once the training is complete you can see there is a folder created in “loras” Folder in the project files and you can see the folder name matching to the name given in Step E.
- You can then go back to the “Model” tab and on the right side you should see the “Lora(s)” dropdown box. Once you have selected that you should be able to see loras and you should find the lora matching the name on step E.
- Now you should be able to use “Chat” using the Lora that was trained.
Note: As of now the training is limited to a particular model “Tap-M/Luna-AI-Llama2-Uncensored”. This works to train the model as discussed in issue.
8. Conclusion
As we conclude our exploration of Cloudera CML AMP and Text-Generation-WebUI, it’s essential to reflect on the transformative potential of these tools.
Here are some key takeaways:
Rapid Deployment and Reduced Risk: CML AMPs streamline the development of machine learning projects, accelerating time to value. By providing pre-built and tested solutions, they significantly reduce the risk of errors and problems in production.
User-Friendly Text Generation: Text-Generation-WebUI provides a user-friendly interface for working with large language models.
Versatility and Flexibility: Text-Generation-WebUI supports a wide range of language models, and its customizable parameters empower you to fine-tune your text-generation experience. You can engage with it for a multitude of tasks, from creative writing to chatbot development.
Integration and Automation: Through REST APIs, you can integrate the UI into your applications, automate text generation tasks, and build custom solutions. This level of flexibility opens up endless opportunities for developers and users.
Training for Customization: Training your machine learning models becomes accessible with clear steps. You can format datasets, select models, tune parameters, and evaluate performance. This customization empowers you to tailor the AI to your specific needs.
In closing, Cloudera’s CML AMP and Text-Generation-WebUI form a powerful partnership that fosters innovation and creativity. This blog has provided a glimpse into the possibilities, and the future holds even more exciting developments.
Whether you’re a seasoned AI practitioner or someone new to the field, these tools invite you to explore, experiment, and create. They pave the way for groundbreaking applications, new insights, and innovative solutions. As technology continues to advance.
Embrace this revolution, and stay tuned for more on these remarkable tools, as the world of AI and text generation unfolds before our eyes.
.
9. Additional Resources